So far, the Eco-friendly, Allergy-free House project has been through 2 winters; the first winter, in 2016, before full external lock-up, almost completely disabled, laid flat with exhaustion and headaches, I was living/existing in one of those mouldy rentals from hell; we were behind time with the build; so many things haven’t gone as planned; however, disasters have been averted, and for that I’m grateful. Over the last year, to be almost exact, I’ve been onsite, pottering away in the eco-friendly, allergy free house, without mould symptoms. Soaking up the sun’s rays while indoors; often thinking about one thing: mould. The house has been at a standstill while the outside is prepared: concrete etc. to keep the build clean while indoor work happens. This is what happened leading up to stage 3, where we’re at now:
Keeping my eye on the weather: we wrapped the top floor of our house in plastic to stop water coming in. We had wrapped the house in Kingspan, a breathable wrap that also acts as a light thermal break.

The plastic worked for two storms that pelted the house with relentless rain until, along with strong winds, water came pouring in off the whole western side of plastic wrap as it flapped its way in and out on stormy winds, wetting the concrete and the adjoining floor-level hardwood house frame. It had to be dried and cleaned up, pronto. I thought that would be it, because I aired religiously, had heaters and fans running but when I saw grey fur growing up the wall in the bathroom, which was confirmed by our remediater, Darin, from Barwon Restoration Services. It gave me such a fright to see mould in the build like that. I pictured myself living in my car… Then took immediate action:
When Barwon Restoration Services came over to give us a free quote, Darin, said our house was by far one of the least damaged buildings he’d seen that winter and one of the cleanest, and that:
“Buildings that sit unfinished over winter can have huge mould problems.”
Darin explained that as the weather turned to August, and mould grew on hardwood of the bathroom, it, being as thin as plywood, and on the north side, the moisture within the building must have been absorbed, and unable to dry, and then, once the weather reached 22c plus, mould grew.

It happened so fast, it seemed. (Approximately ten days after water entry. And that mould grew over just 3 days, turning black before we even managed to change it! (I was checking and airing the house on most days, what, with all that rain.) With Darin’s advice, Dan replaced the materials that had mould on them, leaving the bathroom looking clean once again. But was it?

In my view, it would have been impossible to clean mould that was half way into the wood.
Each area of the house, a biological reading was taken: it was cheaper than a mould test.

Any area that was black and gave a reading was replaced. Areas that appeared clean but gave a reading were cleaned. Areas of moisture concern were dried out using fans and heaters. We replaced around 12 pieces of wood. And went through so many cleaning rags, 3 vacuums (1 was stolen) 4 bottles of dishwashing liquid and some peroxide in particular areas.
The Clean Up
The mould clean up began. Even Darin said that if I didn’t have such a sensitivity to mould, it would be overkill for most people. More importantly, to me though, what if it wasn’t? Lol, and I thought I was losing my mind over mould then. (It felt like impending disaster.) Oh, and then Dan bought a bottle of Concrobium from Bunnings, cause you know, we all want a product that will just magically make it disappear; it was recommended not to use it based on the idea that the remediation company never used biocides with occupants who have compromised immune systems. The Concrobium went in the bin. Close call, there!
Early on, Darin had been most receptive of the Shoemaker research, doctor’s letters and my explanation of what mould had done to my life and the lengths I now had to go to avoid it. Thankfully, he understood that I wouldn’t be able to live there if mould took over the house. Dan would have an investment but I’d have no home! Between the three of us, we worked out a remediation clean up that wouldn’t make me sick:
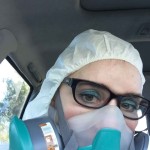
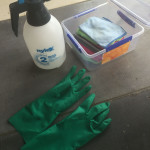
Dan and I suited up and did the clean up ourselves. Our only mistake was not taping around the edge of the cuffs of the tyvek suits and Hunter boots, and double set of nitrile gloves, but other than that, we masked up and did alright!:

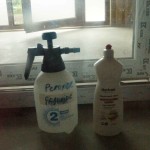
We didn’t even use Barwon Restoration Service‘s products, instead, based on their advice, using our dishwashing liquid; a particular percentage of peroxide; a huge bag of white throw away rags from Costco; and more dishwashing liquid for the wipe up of the whole upstairs, instead, paying attention to the bathroom and other immediate areas.
It’s a dangerous thing, dead mould.
Peroxide is dangerous too, because dead spores break up into fragments, can become embedded in your belongings, and, given the right, moist environment, can possibly desecrate your life. We then used sabco cloths and a HEPA vacuum to clean up any remaining spores.
(This is a true story; it’s happened to myself and many others who either have faulty HLA’s (human leukocyte antigens) and/or have lived in a water damaged building (WDB).
For education’s sake, my HLA’s are 4, 7, 2 and 8, which, using the Australian version of ‘My House Makes me Sick HLA calculator‘ and the results of my blood test, computes to this:
4-3-53 – Multisusceptible/Chronic Fatigue
Had I have known that this was only the first of many clean ups to come, I’d have thrown myself on the floor, curling up into foetal position, hands over my eyes so I couldn’t see the HEPA vacuum looking back at me. This was the 2nd and the last mould clean up I took part in. Spraying peroxide and wiping each area with only one wipe of a clean cloth, then another one with straight up detergent was a royal pain in the backside. However, we were able to save money doing this part ourselves. The reason I refuse to do it again is I now know how sick mould can make me.
We used air washing, using cross-ventilation and sea winds to clear the house in the coming weeks.
Feeling a bit like a superhero with a biology degree in mould, through the build, I was able to purchase a water reader for around $80, very basic; and a thermal imaging camera. I spent many hours at the house, checking for air leaks where water vapour could get through, or worse, water… I lost sleep over the build everytime it rained, unless I was there. So I went and stayed there, spending many nights checking for water entry when it was raining, I thought I was going nuts, so it was good to get biological readings on any suspect timber over the next few months. Finally, it was at lock up and all windows and doors were flashed, keyed and securely in.

Mould Entry no.2
It was September 2016, nearly a year ago.
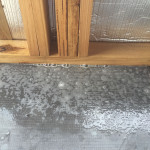
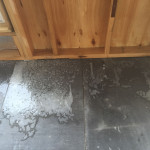
Come November, one morning, after sleeping there during wet weather—yet again—I did my usual rounds, clattering ladder behind me, moisture reader and thermal imager in the front pocket of my overalls. To my horror, one of the hardwood window ledges had a pool of water on it. No moisture reader needed! I couldn’t believe my eyes. This area faced south; where the heavy rain and south westerlies come in.

(Our UPVC (the ‘u’ stands for ‘un-plasticised’) windows were made in Germany but when they arrived, one window didn’t quite fit, so we had one from an Australian company placed into that space. It looked the same. Until it leaked.) It took a few weeks to get the window removed so the area could be remediated. I think I counted the minutes of those few weeks.
We had to prove where the water was coming in so they could take responsibility. That’s the thing when working on a house yourself, if something goes wrong, you need to trace it back to the person responsible and everyone says it’s everyone else’s fault. We didn’t know if it was the flashing, the structure of the timber or the window itself. The thermal imaging camera gave the answer to that question: the thermally-broken chamber was taking in and holding water, which then leaked out slowly into the building via the window reveal:

Once again on advice from our remediatior, we waited until just before sundown, when the temperature drops outside, leaving any trapped water within the building envlope at a higher temperature.

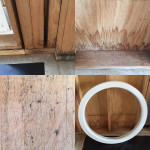
The inside of a window’s thermally broken chamber looks like this:

(Image is not the brand that leaked, rather the one I’d tested for suitability early on in the planning stages.)
One wrong product or chemical used in the build could make it unlivable. Mould, impossibly so.
Once it was established how the water was getting in and who was responsible, the window was removed. By then it looked like this:

During remediation, the above area was sanded back. To replace the materials, it was a matter of pulling apart the outside wall of the house. Darin came over and promptly sealed off the area using Grunt plastic. But not before he generously assisted Dan in boarding up the hole in the south facing wall: the area needed to be as air tight as possible for the pressurised room where the window had leaked. It was only a little mould. Should be fine being only small amount, right? We all thought so.

Also of concern: The hardwood reveal in the corner-but window (next to the above window) had black dots all over it. Due to my recent CIRS diagnosis, we needed to know if it was mould: it gave a reading of 180. Anything over 60-80 wasn’t good. Rather than clean that area, we opted to replace that piece of hardwood also. This way, it was a sure thing! Better to be safe than sorry, and we were on a budget: a mould test wasn’t out of budget but we did have to chose where to spend money: materials and HEPA scrubbers or testing and remediation of materials and HEPA scrubbers?
After the room was remediated, cleaned and I’d stayed away for a few weeks, I returned and all was fine. I was symptom free. The window reveal had been painted in clear Safecoat. (I did, however, return the night the air scrubbers were cleaning the house. I would have to say that was the most intense mould reaction I’ve ever had. And I got it walking into the property, from the front yard. The air being expelled from the house was blown in my face by the wind. My face and hands felt like they were on fire. I actually thought the house was sure to be ruined considering the reaction of my skin!)
However, a few months later, I noticed the paint was bubbling up. This meant there was moisture, possibly mould, in the wood. Still! All other reveals were fine. Our indoor remediation had not been for nothing: it was an important learning experience: it’s better to the replace mouldy materials than remediate them, where possible.
Next, in Part II: Our back deck, shockingly, needs remediation: we have to replace our whole back deck after the hardwood supporting beams are now black with mould—as is the MgO board, which was yet to be sealed or waterproofed.

More
Toxic Mould Support Australia: Remove, Don’t Kill Mould – Part 1 – Building Materials
Leave a Reply